Python MySQL Replication ? python으로 MySQL binary log 이벤트를 가져올 수 있는 라이브러리 


MySQL 변수값 세팅


MySQL 8.0.14 이상 버전 : 글로벌 변수 binlog_row_metadata='FULL' 와 binlog_row_image='FULL'로 설정

    •  binlog_row_metadata : 행 기반 로깅을 사용할 때 바이너리 로그에 추가되는 테이블 메타데이터의 양을 구성
      • MINIMAL (default) :  SIGNED flags, column character set and geometry types와 관련된 메타데이터만 로깅
      • FULL :  column name, 열 이름 이나 문자열 값, ENUM or SET string values, PRIMARY KEY 정보 등과 같은 테이블에 대한 전체 메타데이터가 로깅
    • binlog_row_image : 행 이미지가 바이너리 로그에 기록되는 방식을 결정
      • full (default) : 모든 열을 기록
      • minimal : 변경된 열과 행을 식별하는 데 필요한 열만 기록
      • noblob : 불필요한 BLOB 및 TEXT 열을 제외한 모든 열을 기록


먼저, 변수 값 확인

mysql> show variables like 'binlog_row_image';
+---------------------+---------+
| Variable_name       | Value   |
+---------------------+---------+
| binlog_row_metadata | MINIMAL |
+---------------------+---------+
1 row in set (0.01 sec)

mysql> show variables like 'binlog_row_image';
+------------------+-------+
| Variable_name    | Value |
+------------------+-------+
| binlog_row_image | FULL  |
+------------------+-------+
1 row in set (0.00 sec)


'FULL' 이 아닌 변수는 세팅을 다시 해준다

mysql> SET GLOBAL binlog_row_metadata = 'FULL';
Query OK, 0 rows affected (0.00 sec)

mysql> SET GLOBAL binlog_row_metadata = 'FULL';
Query OK, 0 rows affected (0.00 sec)


설치 


pip로 설치 가능 

pip install mysql-replication


사용 예제 

화면에서 binlog 출력 보기 

from pymysqlreplication import BinLogStreamReader
from pymysqlreplication import row_event
import configparser
import pymysqlreplication

parser = configparser.ConfigParser()
parser.read("pipeline.conf")

hostname = parser.get("mysql_config", "hostname")
port = parser.get("mysql_config", "port")
username = parser.get("mysql_config", "username")
password = parser.get("mysql_config", "password")

mysql_settings = {
    "host" : hostname,
    "port" : int(port),
    "user" : username,
    "passwd" : password
}

b_stream = BinLogStreamReader(
            connection_settings= mysql_settings,
            server_id=10,
            only_events=[row_event.DeleteRowsEvent,
                         row_event.WriteRowsEvent,
                         row_event.UpdateRowsEvent]
            ) 

for event in b_stream:
    event.dump()

b_stream.close()


  • BinlogStreamerReader() : Connect to replication stream and read event
    • connection_setting : Connection settings
    • server_id : a unique server ID for each replication server, in the range from 1 to 232 − 1
    • only_events: Array of allowed events
      • row event : This events are send by MySQL when data are modified
        • row_event.DeleteRowsEvent : This event is trigger when a row in the database is removed
        • row_event.WriteRowsEvent : This event is triggered when a row in database is added
        • row_event.UpdateRowsEvent : This event is triggered when a row in the database is changed


=== WriteRowsEvent ===
Date: 2025-03-20T11:21:47
Log position: 1856
Event size: 29
Read bytes: 12
Table: pipeline.orders
Affected columns: 3
Changed rows: 1
Column Name Information Flag: False
Values:
--
* OrderID : 1
* OrderStatus : Shipped
* LastUpdated : 2020-06-09 02:50:00

=== WriteRowsEvent ===
Date: 2025-03-20T11:21:47
Log position: 2171
Event size: 29
Read bytes: 12
Table: pipeline.orders
Affected columns: 3
Changed rows: 1
Column Name Information Flag: False
Values:
--
* OrderID : 3
* OrderStatus : Shipped
* LastUpdated : 2020-07-11 17:00:00


출력이 잘 되는 것을 확인할 수 있다~~ !


*  Binary Logging Options and Variables
https://dev.mysql.com/doc/refman/8.4/en/replication-options-binary-log.html

* Replication and Binary Logging Options and Variables
https://dev.mysql.com/doc/refman/8.4/en/replication-options.html

* python-mysql-replication
https://github.com/julien-duponchelle/python-mysql-replication/tree/main

* Python MySQL Replication’s documentation
https://python-mysql-replication.readthedocs.io/en/latest/index.html


'! > python' 카테고리의 다른 글

configparser 사용하기  (0) 2025.03.21
pymysql 사용하기  (0) 2025.03.20
python 문법 가이드  (0) 2025.03.14
python test  (2) 2024.09.26
[Error] ValueError: setting an array element with a sequence  (0) 2023.08.08

configparser는 ini 파일 형식을 따르는 구성 파일을 읽을 때 사용할 수 있다


 * ini 파일 구조 

examlple.ini

[section] 
key1 = value1
key2 = value2

# 주석 
; 또 다른 주석
  • INI 파일은 키-값 쌍으로 구성된 구조와 구문을 가진 일반 텍스트로 구성된 컴퓨터 소프트웨어 용 구성 파일
  • 섹션 정의 후 키-값 쌍 정의 


* configparser 사용해 구성파일 읽어보기

pip install configparser
  • pip를 이용해 설치가능 


import configparser

parser = configparser.ConfigParser()
parser.read("example.ini")

value1 = parser.get("section", "key1")
value2 = parser.get("section", "key2")
  • configparser.ConfigParser() 객체 만들어주기 
  • .read() 를 통해 파일 읽어주기 
  • .get(읽을 섹션 이름, 읽을 키) 를 통해서 원하는 값을 읽어준다 


예시)  ini 파일 구조를 따르는 .conf 파일 읽어보기 

project.conf

[mysql_config]
hostname = 127.0.0.1
port = 3306
username = my_user_name
password = my_password
database = my_db
  • MySQL 설정값을 저장한 project.conf 파일


import configparser

parser = configparser.ConfigParser()
parser.read("project.conf")

hostname = parser.get("mysql_config", "hostname")
port = parser.get("mysql_config", "port")
username = parser.get("mysql_config", "username")
dbname = parser.get("mysql_config", "database")
password = parser.get("mysql_config", "password")
  • .get(섹션, 키) 로 원하는 값을 읽을 수 있다 


* configparser
https://docs.python.org/ko/3/library/configparser.html  


'! > python' 카테고리의 다른 글

Python MySQL Replication 사용하기  (0) 2025.03.27
pymysql 사용하기  (0) 2025.03.20
python 문법 가이드  (0) 2025.03.14
python test  (2) 2024.09.26
[Error] ValueError: setting an array element with a sequence  (0) 2023.08.08

* pymysql : python으로 MySQL 쿼리 조작하기 위한 라이브러리


터미널에서 파이썬 가상환경을 만들어주고 진입

$ python3 -m venv env
$ source env/bin/activate
(env) $


터미널에서 가상환경에 pip를 이용해 사용할 라이브러리를 설치해준다.

(env) $ pip install pymysql
(env) $ pip install cryptography

(env) $ pip install pymysql[rsa]
  • pymysql : Python MySQL 클라이언트 라이브러리
  • cryptography : MySQL에서 sha256_password 또는 caching_sha2_password 인증 방식을 사용할 때 필요
    • 혹은  $ pip install pymysql[rsa]   로 한꺼번에 가능 


설치 끝... ! 


이제 파이썬 스크립트로 SQL 사용 가능

import pymysql

# 데이터베이스 연결
connection = pymysql.connect(host='localhost',
                             user='user',
                       	     password='passwd',
                       	     database='db',
                       	     port=3306)


if connection is None:
    print("MySQL Connection 에러..")
else:
    print("MySQL Connection 성공!")
  • 먼저 MySQL 정보를 넣어서 데이터 베이스를 연결해 준다 
    • host : 사용할 MySQL 호스트 주소 (ex. localhost, 127.0.0.1)
    • user : 사용할 유저네임
    • password : 유저네임에 맞는 비밀번호
    • database : 사용할 데이터베이스(스키마)
  • "MySQL Connection 성공!" 이 나오면 성공 ~! 


connection.cursor() 를 이용하여 excute() 후 fetchall() 하여 쿼리 결과를 모두 가져온다.

사용 후 close() 필수

my_query = "SELECT * FROM World;"

my_cursor = connection.cursor()
my_cursor.execute(my_query)
results = my_cursor.fetchall() # 쿼리 결과 모두 가져옴 
print(results)

m_cursor.close()
conn.close()
  • connection.cursor().fetchall() : 쿼리 결과 모두 읽기
  • connection.cursor().fetchone() : 쿼리 결과 하나 읽기


close() 하기가 귀찮으면 아래처럼 with 구문을 사용한다

with connection:
    with connection.cursor() as cursor:
        my_query = "SELECT * FROM World;"
        cursor.execute(my_query) 
        result = cursor.fetchone() # single record 읽기
        print(result)


※ 주의 ※


insert 처럼 데이터베이스 수정이 이루어지면 파이썬 코드에서 

connection.commit()

을 사용해서 커서 사용 후 커밋을 해준다!! 

with connection:
    with connection.cursor() as cursor:
        # Create a new record
        my_query = "INSERT INTO 'users' ('email', 'password') VALUES (%s, %s)"
        cursor.execute(my_query)

    # connection is not autocommit by default. So you must commit to save
    # your changes.
    connection.commit()


pymysql : https://pypi.org/project/PyMySQL/ 

'! > python' 카테고리의 다른 글

Python MySQL Replication 사용하기  (0) 2025.03.27
configparser 사용하기  (0) 2025.03.21
python 문법 가이드  (0) 2025.03.14
python test  (2) 2024.09.26
[Error] ValueError: setting an array element with a sequence  (0) 2023.08.08

인덴트

  • 공식 가이드 PEP8에 따라 공백 4칸이 원칙
  • 아래와 같은 인덴트 규칙이 있지만.... PyCharm 같은 IDE를 사용하면 알아서 맞춰줌
# 첫 번째 줄에 파라미터가 있다면? 
# 파라미터 시작되는 부분에 보기 좋게 맞춤
foo = long_func_name(var_one, var_two,
                     var_tree, var_four)
                    
# 첫 번째 줄에 파라미터가 없다면? 
# 공백 4칸 인덴트 한 번 더 추가 하여 다른 행과 구분
def long_func_name(
        var_one, var_two,var_tree, 
        var_four):
    print(var_one)
    
# 여러 줄로 나눠 쓸 경우? 
# 다음 행과 부분되도록 인덴트를 추가
foo = long_func_name(
		var_one, var_two,
		var_tree, var_four)


네이밍 컨벤션 

  • 파이썬의 변수명과 함수명은 스네이크 케이스(snake_case)를 권장 
  • snake_case, camelCase, PascalCase ..


타입 힌트 

  • 파이썬은 동적 타이핑 언어지만, 타입을 지정할 수 있는 타입 힌트가 있음
# 변수명 타입 힌트
a: str = "1"
b: int = 1

# 함수 타입 힌트 
def fn(a:int) -> bool:
    ...
  • 타입 힌트 오류 자동 확인 패키지 사용 : pip install mypy ($mypy test.py  --> 터미널에서 이처럼 사용)


리스트 컴프리헨션 

  • 파이썬은 map, filter와 같은 함수형 기능을 지원하고, 람다 표현식도 지원 
  • 리스트 컴프리헨션은 가독성이 좋은 편이지만 무리하게 작성할 경우 가독성을 떨어뜨림
  • 역할별로 줄 구분을 하면 훨씬 가독성이 높아지고 이해하기 쉬워짐, 대체로 표현식은 2개를 넘지 않아야 함 
>>> list(map(lambda x: x+10, [1, 2, 3]))
[11, 12, 13]

# list comprehension in dictionary
a = {key: value for key, value in original.items()}


제너레이터 

  • 루프의 반복 동작을 제어할 수 있는 루틴 형태 
  • yield 구문을 사용하여 제너레이터 리턴 
    • yield는 제너레이터가 여기까지 실행 중이던 값을 내보낸다는 의미, 중간값을 리턴한 다음 함수는 종료되지 않고 계속해서 맨 끝에 도달할 때까지 실행됨 
  • next() 로 다음 값을 생성 
  • 제너레이터는 여러 타입의 값을 하나의 함수에서 생성하는 것도 가능 


range

  • 제너레이터 방식을 활용하는 대표적인 함수 
  • range 클래스를 이용하면 메모리 점유율이 훨씬 작음 (생성 조건만 보관하기 때문)
  • 인덱스로 접근 시에 바로 생성하도록 구현되어 있기 때문에 리스트와 거의 동일한 느낌으로 사용


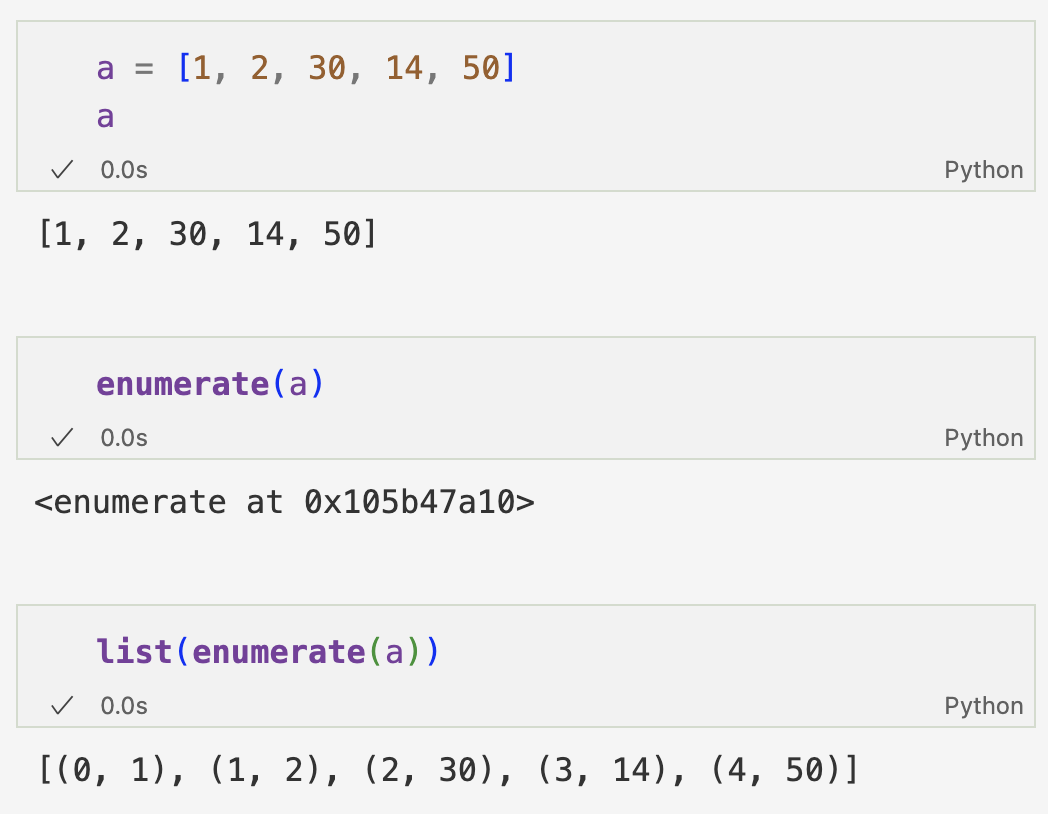
enumerate

  • 순서가 있는 자료형(list, set, tuple 등)을 인덱스를 포함한 enumerate 객체로 리턴 
  • 리스트의 값과 인덱스를 한 번에 처리 


// 나눗셈 연산자 

  • 몫을 구하는 연산자, 정수형을 나눗셈할 때 동일한 정수형을 리턴하면서 내림 연산자의 역할 
  • 5 // 3 == int(5 / 3)
  • %  : 나머지 연산자 
  • divmod(5, 3) # (1,2) : 몫과 나머지 한 번에 구할 때


print


pass 

  • 널 연산으로 아무것도 하지 않는 기능 
  • pass는 먼저 목업 인터페이스부터 구현한 다음에 추후 구현을 진행할 수 있게 함 


locals

  • locals() : 로컬 심볼 테이블 딕셔너리를 가져오는 메소드
  • 로컬에 선언된 모든 변수 조회 


구글 파이썬 스타일 가이드 

  • 함수의 기본 값으로 가변 객체를 사용하지 않아야 한다
  • True, False를 판별할 때는 암시적인 방법을 사용하는 편이 간결하고 가독성이 높다
# False 판별시 암식적으로 판별
if foo: # if foo != []

# 길이가 없다는 말은 값이 없다는 뜻이며 암시적으로 판별
if not user: # if len(user) == 0 

# 정수 처리시에는 암시적 거짓 여부를 판별하기 보다는 직접 비교
if foo == 0: 

# 모듈로 연산 결과도 명시적으로 값을 비교
if i % 10 == 0:
  • 세미콜론으로 줄을 끝내서는 안된다
  • 세미콜론을 사용해 같은 줄에 두 문장을 써서도 안된다
  • 최대 줄 길이는 80자로 한다


파이썬 철학 


아름다운 것이 추한 것보다 낫다.

명시적인 것이 암시적인 것보다 낫다.

단순한 것이 복잡한 것보다 낫다.

복잡한 것이 난해한 것보다 낫다.

평평한 것이 중첩된 것보다 낫다.

드문드문 있는 것이 빽빽한 것보다 낫다.

가독성이 중요하다.

특수한 경우라 해도 규칙을 깨뜨릴 만큼 특별하진 않다.

하지만 실용성이 순수함을 이긴다.

오류는 절대 조용히 지나가서는 안 된다.

단, 명시적으로 무시된 경우는 예외다.

모호함에 직면했을 때, 추측하려는 유혹을 뿌리쳐라.

어떤 일을 하는 방법은 하나, 그리고 가능하면 유일한 하나가 있어야 한다.

그 방법이 처음에는 명확하지 않을 수도 있지만, 네가 네덜란드인이 아니라면 말이다.

지금 하는 것이 결코 하지 않는 것보다 낫다.

다만, 지금 당장 하는 것이 항상 최선은 아니다.

구현을 설명하기 어렵다면, 그건 나쁜 아이디어다.

구현을 쉽게 설명할 수 있다면, 아마도 좋은 아이디어일 것이다.

네임스페이스는 엄청나게 훌륭한 아이디어다. 그러니 더 많이 활용하자! 

'! > python' 카테고리의 다른 글

configparser 사용하기  (0) 2025.03.21
pymysql 사용하기  (0) 2025.03.20
python test  (2) 2024.09.26
[Error] ValueError: setting an array element with a sequence  (0) 2023.08.08
matplotlib.pyplot 사용하기  (0) 2023.08.08

+ Recent posts